Narrative
Our Narrative is about situations that some of us can find ourselves in life, though not everyone is robbed in they’re lifetime, it is a pretty ordinary situation and everybody can relate to similar events.
The narrative also has themes of dreams and ambitions as we see the main character move from ordinary student to your awesome superhero, in the same day achieving his dream of dance music superstardom. Both these scenarios are ordinary but the idea of achieving all your hopes and dreams is somewhat surreal to most of us.
We think we achieved what we aimed to do from the very beginning which was to create a product that our audience would be able to interact with in they’re daily lives as its thought provoking and can be interpreted in a number of ways. It’ll get people talking!
Editing
The majority of the editing moves away and challenges the surreal nature of most dance music videos because it’s a little bit like a shot screenplay told through music. However is does have a sub theme which shows conventions of a comic book with colour words popping out (The usual KABOOM type thing of you get in comic books)
Camera Movement
We attempted to use meaningful camera movement such as at 0:40 when the music slows down, slight bass is added and everything slows down at the same time the camera slowly moves up our new superhero signalling a new beginning, and basically indication that this is a pivotal moment in the video.
Meaning Is also added to another camera movement at 2:29 when the hero is running into the distance, the camera moves into the next shot showing continuous movement
Diegesis
Showing posts with label Jordan thornhill. Show all posts
Showing posts with label Jordan thornhill. Show all posts
Monday, 23 January 2012


Monday, 16 January 2012
Thursday, 12 January 2012
Final Ancillary Tasks


These are the final ancillary products that we have created. There is a CD, a poster advertising the release of the single and a digipak that the single would come in. They were created in Photoshop and our aim was to create a Brand Identity throughout.
Tuesday, 10 January 2012
DigiPak Ancillary Text Feedback Sheet
A sheet was used to gather further feedback from peers on if the product matches criteria, and any flaws/positives the product has.
Strengths of the ancillary texts so far
Strengths of the ancillary texts so far
- Great colour scheme that matches the overall products throughout.
- The shots used relate back to shots present in the video, making a clear connection between the two.
Areas for possible improvement
- At the time of review, there was little text on the digipak. This is now fixed as the likes of a track-list has been added.
- More colour was needed to make the digipak stand out from the crowd, so this was reviewed.
How effective is the brand identity
- The logo relates to the genre it's trying to represent, and is appealing to look at.
- Consistent throughout the products.
- The logo is simple and easy to recognise.
Our evaluation of feedback...
We agree with the feedback such as the idea that we need more colour, as this was something we were currently working on. The other weakness mentioned, the lack of text, is not a priority to fix however as the effect of simple & effective was the desired image. The positive feedback has helped cement the idea that some of our products near completion, and that some changes are not required. We will use our remaining time to finalise our products, using aids such as this feedback to shape the overall outcome.
Photoshop Filter
To get the effect on lots of the pictures we are considering using in the Digipak we used a filter setting, below is the way we did this:
1. Put a picture into Photoshop


1. Put a picture into Photoshop

2. Choose A Filter to put over it

3. You have a different style of image

4. Add Titles and any other Graphics

This is a simple version of one we could use. Extra graphics would be added to it and it would then have a slick professional feel and it would be a good insert for the Digipak.
To get the effect on lots of the pictures we are considering using in the Digipak we used a filter setting, below is the way we did this:
1. Put a picture into Photoshop
1. Put a picture into Photoshop
2. Choose A Filter to put over it
3. You have a different style of image
4. Add Titles and any other Graphics
This is a simple version of one we could use. Extra graphics would be added to it and it would then have a slick professional feel and it would be a good insert for the Digipak.
DigiPack Ideas (using Photoshop)


These are some of the ideas that we as a group have had. These are images that could be used on either the actual Digipak, on the CD or as part of a poster or lyrics booklet. They are all shots from a photo shoot that we did with two of the main characters from the music video. The superhero and the criminal from one of the scenes. They have been created using a filter which is available on Photoshop and in some cases using paintbrush/ similar tools to change colours. We have tried to continue with a white, black and green theme, which is the main colour of the hero in the video.
DigiPack Ideas (using Photoshop)
These are some of the ideas that we as a group have had. These are images that could be used on either the actual Digipak, on the CD or as part of a poster or lyrics booklet. They are all shots from a photo shoot that we did with two of the main characters from the music video. The superhero and the criminal from one of the scenes. They have been created using a filter which is available on Photoshop and in some cases using paintbrush/ similar tools to change colours. We have tried to continue with a white, black and green theme, which is the main colour of the hero in the video.
Second Rough Cut - Feedback From Peers
Positives
Negatives
- Lip Syncing and Narrative matched well to the storyline.
- The thought beats, in the lesson and with the musical instruments, matched well and gave a good effect
- The studio scenes were shot well and it fitted in well with the rest of the storyline.
- The footage that matches up to the sweeping pads in the background fitted in well and made sure that the transition from shot to shot was smooth.
Negatives
- Out of focus shots - these have now been fixed in the video that we expect to be the final one. We have shortened the clip so that it is more controlled and because it was a bit too long, we have added other clips in its place.
- Black Widescreen Borders - Because we zoomed in on one of the shoots using Final Cut and not a camera the borders disappeared. This was a problem as the whole video was in widescreen. We fixed this by adding two black borders, that we created using Photoshop and then imported into Final Cut to fix the product.
- Special Effects in fighting - In the fighting scene it was obvious that none of the hits were making contact. This made the video seem unrealistic and unprofessional. However, we had already thought about this and have put in special effects (See previous posts) that will combat this as they will cover this up, as we wanted it to, and also give a more 'Superhero Comic Book' sort of theme. It also takes away the seriousness of the video and makes it more accessible for a wider audience.
Tuesday, 10 January 2012
Revised Final Cut
at 02:19 nn the 2nd Narrative, we added a cartoon effect due to feedback given by our tutor. 'The cartoon effect is good, but it needs to be a consistent theme across the whole of the video and it would help if the second narrative had a cartoon theme effect somewhere.'
Tuesday, 3 January 2012
Viral MArketing Ideas
The idea being to print these images and scatter them around, anywhere and everywhere. town centers, shopping markets/mall. COlleges school. Friends family. Get them seen everywhere.


Thursday, 24 November 2011
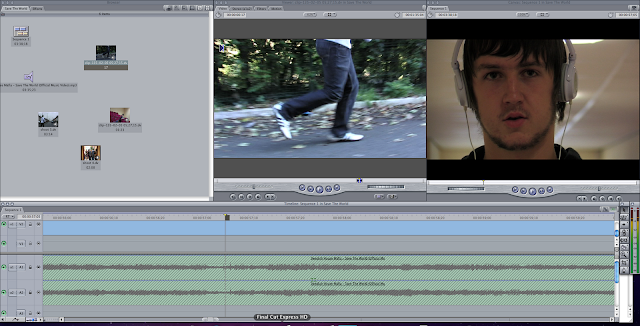
This is the typical interface used when editing the clips recorded, with a specific set-up being used throughout to allow smooth and efficient editing, and enable quick development of skills in Final Cut. The typical setup (as shown in the image) goes as follows:
- All recording 'sessions' to be separate and readily available in the top-left of Final Cut, allowing quick access to cut and edit as needed (using the middle screen).
- Middle screen to allow playback of fully recorded clip sessions and break it down into clips as needed, using the 'in and out' tool.
- The right screen showing a preview of how the actual 'final' product looks.
- The track timeline remains at the bottom, with the music track remaining locked throughout (apart from introduction) to prevent accidental change. Video track(s) to be above with the ability to freely move and edit.
Main Tools Used while Editing
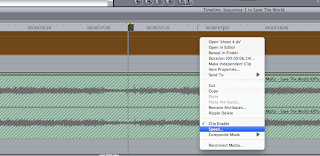
Speed/Slow-Motion

'In and Out' Tool

The 'in and out' feature of Final Cut is a vital part of our editing, allowing the clips recorded in a constant flow to be broken up into desired clips and editing freely on the timeline.

The Razor Blade tool was used to quickly cut clips on the timeline, allowing the moving of clips or removal completely when needed.
Monday, 21 November 2011


Tuesday, 1 November 2011
Shooting Schedule
The shooting schedule is as the shots will be filmed on different days. All evidence will be added as soon as its acquired during filming.
Day 1
Day 1
Day1
View more documents from Rocky Cyrus
Day 2
Day 3
Day 2
Day 3
Tuesday, 18 October 2011
Animatic
The animatic is our first proof of concept, the way it looks will give us a rough idea of how successful our video should be if it's going to be a success at all. When the animatic is being put together we're testing our idea and the timing within it, giving us an idea of what we should be doing during filming to get the desired result in post production/editing.
Monday, 17 October 2011
Costume shoot
Criminal Outfit 1


Superhero Outfit 1


Superhero Outfit 2


Subscribe to:
Posts (Atom)